

Add realistic smoke video effects to your next film or music video by downloading our free pack ofSmoke FX from CinePacks! This tool is fantastic because it’s so simple to use, doesn’t cost a cent, and can add a unique touch to any video production. No plugins are needed, so you can get to using these smoke overlays in your editing program right away. Check out how to use these free DaVinci Resolve video effects, then start experimenting with them today! (Also, try combining them with our freeFire FX sample pack as well to make something truly extraordinary!)
Note: This is a DaVinci Resolve tutorial but these free video effects also work in Final Cut Pro and Adobe Premiere Pro as well.
Find the Free Smoke FX pack on the CinePacks website. This is a free pack, so all you have to do is provide us with your email address so we can send you the download link. Once you receive the link in your inbox, download and unzip the folder of free video effects and transitions. This free pack includes 28 unique smoke overlays shot in 2K quality. Import all of these video effects into DaVinci Resolve.

To use these smoke overlays, drag the video effect straight into your timeline above your footage and change the Composite Mode to Screen. You can adjust any of these overlays to your liking by rotating, resizing, or repositioning them under the Transform tab.
You can create a video transition in DaVinci Resolve using these smoke overlays by scaling the smoke overlay to fill the screen and placing it above your two clips. We also added a cross dissolve transition from the effects library to smooth it out even more.

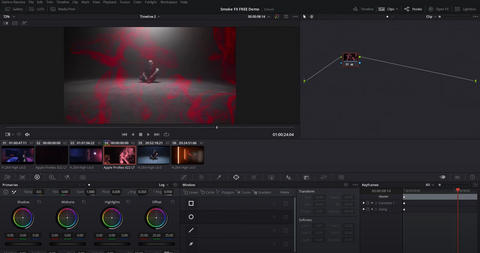
Create a really unique abstract effect by dragging in one of our colored smoke effects and changing the Composite Mode (we used Darken). This creates a sort of reveal of your subject.
All of these smoke video effects can be customized however you like. You can change the color of any of these free video effects by navigating to your Color tab and adjusting the color wheels and/or your RBG mixer until you achieve the color you want. Bringing down the Lift will increase the contrast and bring out the colors more.

To adjust the lighting on one of the black and white effects: Go to your Color tab and select the Gradient under the masks and place it where it will fit best. Then adjust the colors under your RGB mixer to create some colored light. Next, create a new node by right clicking and selecting Add Node → Add Serial. Then you’re going to create a second gradient in the opposite corner of the screen and repeat the same process.

To create an epic smoke overlay transition in DaVinci Resolve, drag the smoke effect you want to use in your timeline and change it to black and white in the Color tab by checking the Monochrome box. Right click on the effect and change the clip speed to something a little faster (we changed it to about 300). In your Color tab, go to your Color wheels and bring down the Lift and bring up the Gain to create a stark contrast (this will help when creating our mask).

Back on your edit page, drag in the second clip that you want to transition with and place it under your smoke overlay effect. Select them both and right click to create a New Fusion Clip, then navigate to your Fusion tab. Rename your nodes so you don’t get them confused and delete the Merge node. Select your Main Footage node and, under Settings, change the channel to Luminance.

Increase the scale of the effects even more and add a Grain to help camouflage any lost quality. Add a Background node, merge it in, and change its color to white. Change its Apply Mode to Screen. Click on the Merge node and add a keyframe to the Blend on the very last frame. Then go to the first frame, bring the Blend down to zero, and add another keyframe. Now when you play it through, the mask will slowly fade to white.
Download Even More Free DaVinci Resolve Video Effects on the CinePacks Website
Get tons of amazingvideo effects for your next production - for FREE! We’ve also developed a multitude of products available for purchase in our packs store that can help you create something truly extraordinary, so head to our website to see what we have for you. Check out our many tutorials for Adobe Premiere Pro, Final Cut Pro, and DaVinci Resolve (all of these can be found on ourYouTube channel) to learn how to use these video effects in different ways. If you ever have questions about any of our video effects or how to use them,get in touch! We’re active onInstagram andFacebook (where you can get the latest updates about our new products) so be sure to tag us in your projects when you use one of our video effects packs!