Give your video clips that authentic, vintage feel with the help of our Super 8 Film FX Pack for Final Cut Pro X. Obtaining and shooting with a true film camera can be complicated (not to mention expensive) but our 8mm film overlay can provide the same aesthetic while saving you a ton of cash! All of our film overlays were created by using real footage captured on an 8mm camera so you can revolutionize your next project with a genuine retro look.
How to Use the CinePacks Super 8 FX
How to Use Film Burns and PNGs
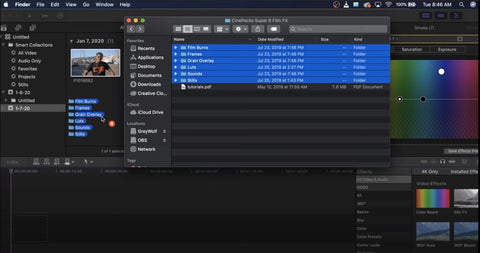
Step 1: Purchase and download the CinePack Super 8 FX Film Pack. Once opened, you’ll see a group of folders that include film burns, film luts, grain overlays, and stills. The film burns are divided into two folders: With Sprocket and Without Sprocket. For the With Sprocket film burns, you’ll see the sprocket included on the left hand side of the effect. The film burns without sprockets are cropped in and no sprocket will be seen.
Step 2: Import all the effects into Final Cut. (Note: Film luts cannot be imported - this will be discussed under Film Luts farther down the blog.)
The PNGs are easy to overlay on top of your footage - simply drag them straight into the timeline. Film burns and transitions can be used by dragging them on top of the PNGs and changing the blending mode to Screen.
How to Use Film Overlays & Film Grains
Drag the film overlay into the timeline on top of your clip. For any of the white film overlays, change the blending mode to Darken or Multiply. Duplicate the film overlay clip as many times as needed in order for it to cover the duration of your footage.
To add a film grain to your 8mm film overlay for additional texture, drag the film grain overlay into your timeline above your footage and under your film overlay. Change the blend mode of the film grain overlay to Overlay.
How to Use Film Luts
To add and adjust the color of your footage, drag the Custom Lut onto your clip. To choose a film lut from the lut pack we provided, click on the drop-down LUT menu (under Custom Lut) and select “Choose Custom Lut.”
Try the different options offered in our lut pack to see which one works with your footage best.
If you’re looking to create an even more realistic aesthetic, you can duplicate the top and bottom clips and stack them to make them look like a true feed from a super 8 camera. Simply copy and paste your clip and lay them on top of each other in the timeline. Using the Transform tool, drag the copied clips directly below and above your original clip (while holding down Shift so the clips aren’t dragged out of line).
In our Super 8 FX pack, we also included some sound effects to integrate throughout your video to further transform your project.
Another cool feature included in our Super 8 FX pack is the Three-Split PNG. This is a lot of fun to play with; simply drag the transparent Three-Split PNG on top of your selected clip. Using the Transform and Crop tools, scale down your clip and move it around to place it anywhere you’d like.
Drag in additional clips to develop a really unique look.
Free Assets
If you'd like to get a preview of what our film overlay pack has to offer, check out our FREE Film FX Sample Pack! These samples will give you a better idea of what our film overlays and grains look like and how you can use them in your next project.
Find Even More Cool Stuff on our Website
The CinePacks website is full of great effects designed to enhance and intensify your footage! Test out some of our products by downloading and using our free packs and watch our other tutorials to learn how to master each one. Be sure to check us out on Instagram to be the first to see our newest additions and reach out to our team if you have questions about anything. We’re here to help you make your filmmaking visions a reality!


